Saturday, December 31, 2011

Happy New Year and Thank you!

‎2011 is coming to end real soon. I will be counting down at the airport as I am going back home after my one month stay in Singapore. 

I would like to take this opportunity to thank all of you, blogger friends, for all your wonderful support. Every comment, encouragement that I have received from you meant a lot to me. It encourages me even more to contribute to this community in the ways that I can. 

I want to wish all of you a wonderful New Year and a blessed 2012. May the next year be even better than this year! I know 2012 is going to be a fabulous for me and my husband as we are expecting our little bundle of joy in April. 

New life, new beginning. I hope you will all join me in this wonderful journey...


With much love,

Uma Preve

Thursday, December 29, 2011

Cheap brush cleaner from Daiso

I am always on the look out for good yet cheap products that work just as good as expensive ones. I think this time I found one that really works.

It costed me SGD$2.00 only. This is a detergent for makeup puff and sponge from Daiso. Even though it says it's for sponges and puffs, I have used it for natural and synthetic hair bristled makeup brushes. It works beautifully! Makes my brushes squeaky clean, just the way I like it!

Daiso is Japanese owned franchise where most of the products are low priced. In Singapore, all items are priced at SGD$2.00. Loads of fun things that you can't find in a regular departmental stores. I am sure Daiso is available in the USA as well. Just google it!


Previously, I was using shampoo to deep clean my brushes. The reason why I did that is because the brushes I mostly use are made of animal haired bristles so it only made sense for me to use shampoo as I would to my own hair. Many of my brushes have lasted me for a really long time. I have brushes that are 9 years old. Yes, I have really old brushes that look just as good as new ones. Moral if the story, if you take good care of the brushes, they will last for a long time (I mean really long!).

How to use the detergent : Place a drop or two on a dish or your palm. Lather up with the dirty brushes using swirly motions and rinse off in luke warm water. Place the brush on a flat surface to dry overnight or for a couple of hours.

Here you can see the how clean the brushes are after using the Daiso detergent to wash them with.

MAC 217 (Animal hair bristle)

Sigma F80 flat top kabuki (synthetic bristle) 

I like how my Sigma F80 brush is clean and the white bristles can be seen. Previously, I was not able to clean this brush well even with mild dish washing liquid and shampoo. Finally found a product that works.

I hope to get a couple of back ups before I leave for Sweden soon. 

I hope you found this post useful and perhaps try the brush cleaner for cleaning your brushes, sponges and puffs.

Hope you all are having a great week.

Sunday, December 25, 2011

Simple sweetheart makeup (using 88 neutral palette)

Viewers request for a simple neutral look using 88 warm palette. I bought mine from Ebay a while back. The warm palette includes loads of neutral shades, great for those who don't like too much color. It has matte and shimmer textures to the shadows to choose from.

It's Christmas time and I am pretty busy but I really wanted to squeeze in some makeup looks for my lovelies. I hope you like it. 


Products used are

EYES
Mac - Dipdown fluidline (eyebrows)
Urban decay - Primer potion
Mac - Constructivist paintpot
88 Palette - Reddish brown e/s
88 Palette - Peachy shade e/s
88 Palette - Neutral highlight e/s
88 Palette - Dark brown e/s
Urban decay - Perversion liquid liner
Loreal - Double extension mascara in black

CHEEKS
La femme - Mocha blush

LIPS
Mac - Speak louder lipstick
Mac - Straight to head lipgelee

Video Tutorial


Wishing all of you lovelies a very MERRY CHRISTMAS! 
May this day be a blessed one!

:)


Thursday, December 22, 2011

Vampy dramatic glittery party makeup (suitable for Christmas or NYE party)

Whenever it's the festive season, I usually gravitate towards dark smokey eyes and glitter. Just love the combination of the darkness and the sparkles. So here is a look, I came up with that would be suitable for a Christmas party or even New year's eve party. I made sure that I used minimum products so that many of my lovely viewers can recreate it using whatever they have in their makeup kit/stash. 

Makeup does not have to be complicated!

Please excuse the lighting as I am not at home where I have a home studio/makeup room with proper lighting. Did the best I can with what I had at hand. I hope you like it. 


Products used are:-

EYES
Mac - Dipdown fluidline (eyebrows)
Elle - Kajal khol
Mac - Blacktrack fluidline
Kryolan - Dark blue e/s
Mac - Naked pigment
Barry M - #21 fine glitter
Ebay - no brand false lashes
Mac - False lashes mascara in false black

CHEEKS
La Femme - Amber blush

LIPS
Mac - Vino lipliner
Mac - Rebel lipstick

Video Tutorial

Thanks for coming by!


Sunday, December 18, 2011

Golden Fuchsia makeup using sponge tip applicator

One doesn't need so many brushes to apply makeup. Simple tools like a sponge tip applicator is all you need to get flawless results. Great for beginners, someone who is on a budget and someone who is always in a rush and on the go!


Products used are:-

EYES
H&M - Brown eyebrow pencil
Mac - Rubenseque paintpoint
Lakme - Silk route eye quad
Urban decay - 24/7 glide on pencil in zero
Loreal - Double extension mascara in black
Ebay - False lashes

CHEEKS
Luminess Air brush - Apricot blusher

LIPS
Nyx - Tea Rose lipstick
Nyx - Nutmeg lip liner


Hope you like this look.

Thanks for coming by!


Thursday, December 15, 2011

Cheap Makeup brush, eyeliner and lipliner holders (great for Makeup Artists)

Recently, I was at an arts and supply store at Bras Basah complex (in Singapore). I was looking at some tools to organize my traveling makeup suitcase. I am a free lance makeup artist and need my tools to fit my suitcase.


This is a holder for paint brushes. Well, I don't see why I can't use it for makeup brushes. Makeup and paint brushes are same same but different!

This paint brush holder holds 30 brushes. I have way more then that in my kit. Yes, I know I am a brush addict. I get some brushes for free too so of course it adds up with the ones I buy too.

This holder costs around SGD$12.00. I think it is a good deal as most makeup brush holders are around the same price and hold only half of what this holder can.

I can even make the holder stand with the velcro strips that is attached (see picture below). 


Some brushes are missing as I have yet to clean them. 

Now, for pencil eye liners and lip liners, I found Copic markers holder (SGD$8.00). I was so excited as I have been wanting this holder for a long time for my Copic markers and was not able to get them in Sweden. Bought a few holders not only for my lip/eye liners but also for my Copic markers.


It can be placed like a stand too! Cool right?!


I hope some of you found the above useful if you were thinking of makeup organizers that are inexpensive.

Do you have any organizing tips to share?
.................................

Hope you are having a pleasant week.


Sunday, December 11, 2011

Japanese skincare: CURE Natural Aqua Gel Exfoliator

It has been 15 days since I came to Singapore. After nursing the jetlag and a small medical issue (where I was hospitalized for two days), I am finally ready for blogging and perhaps making videos... Am taking it slow.

Last week, I was shopping for toiletries at Watsons. For my international readers, Watsons is the Asian version of a drugstore/beauty supply store. After living abroad for a while, everything in Singapore seems  new and interesting to me (even though it has been around for ages!). 

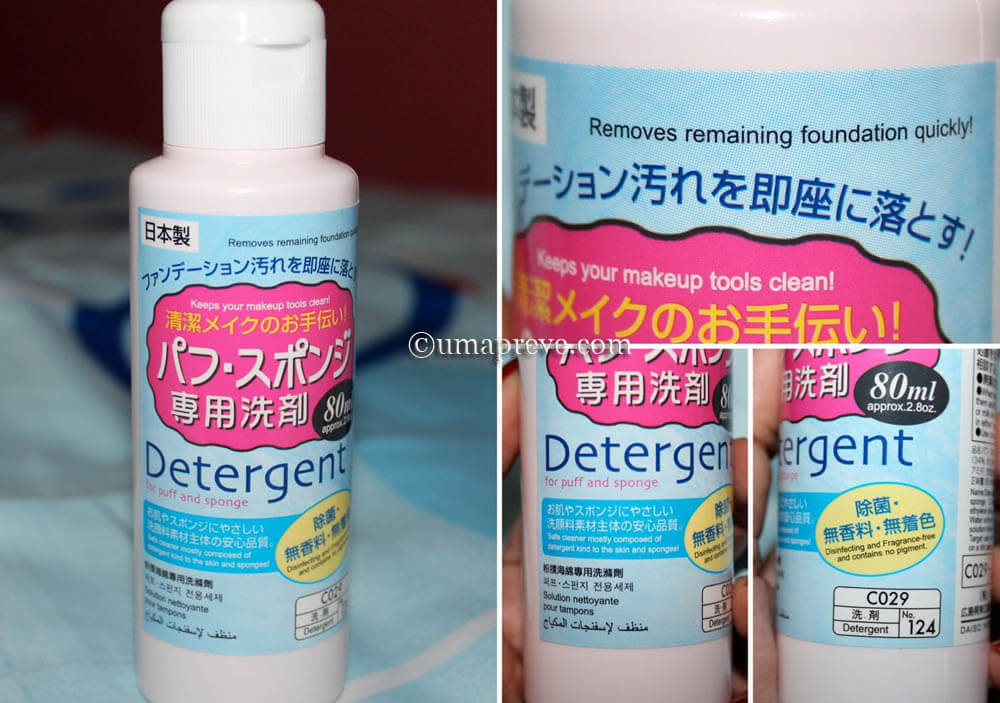
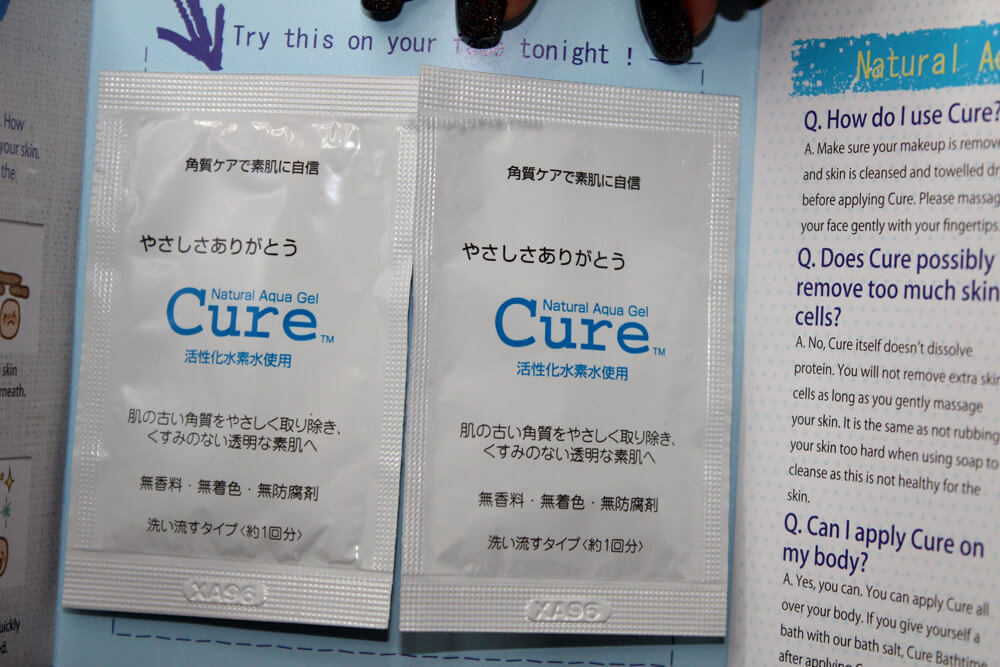
I found an interesting Japanese skincare product. It's called CURE Natural Aqua Gel Exfoliator. As claimed on their site, it's No.1 selling skincare product in Japan and 1 bottle is sold every 20 seconds. Impressive right?! Well, let's see if it is really as good as it claims.

Luckily, I was able to get some samples to try before deciding to buy the full size bottle. All I did was ask for samples at the cashier counter.


You get two small sample packets of products. One packet is enough for an entire face exfoliation.


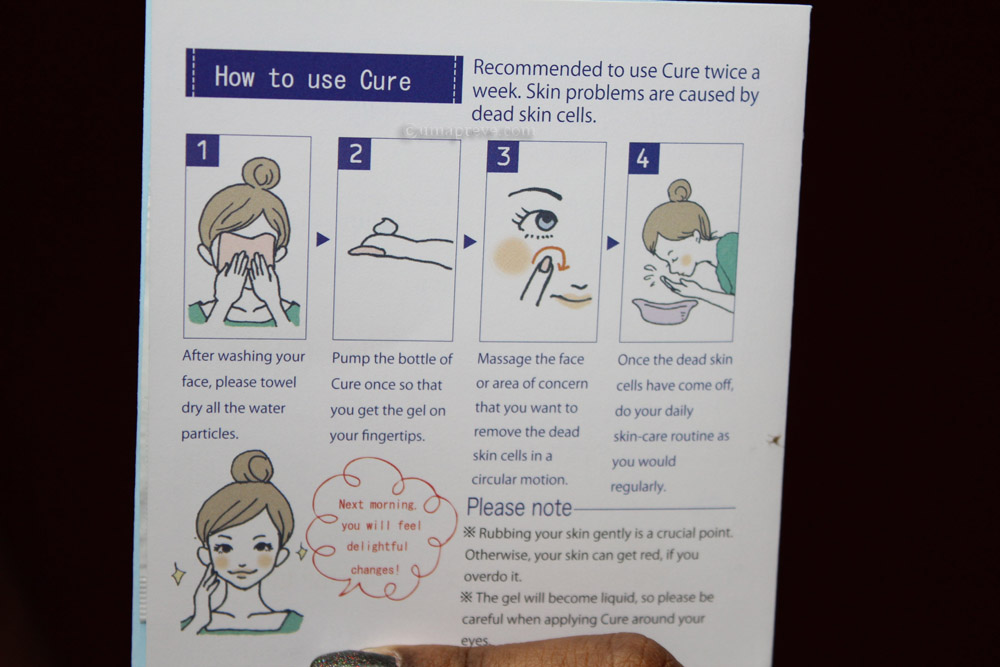
'How to use' instructions included. You can also get this info on their website.


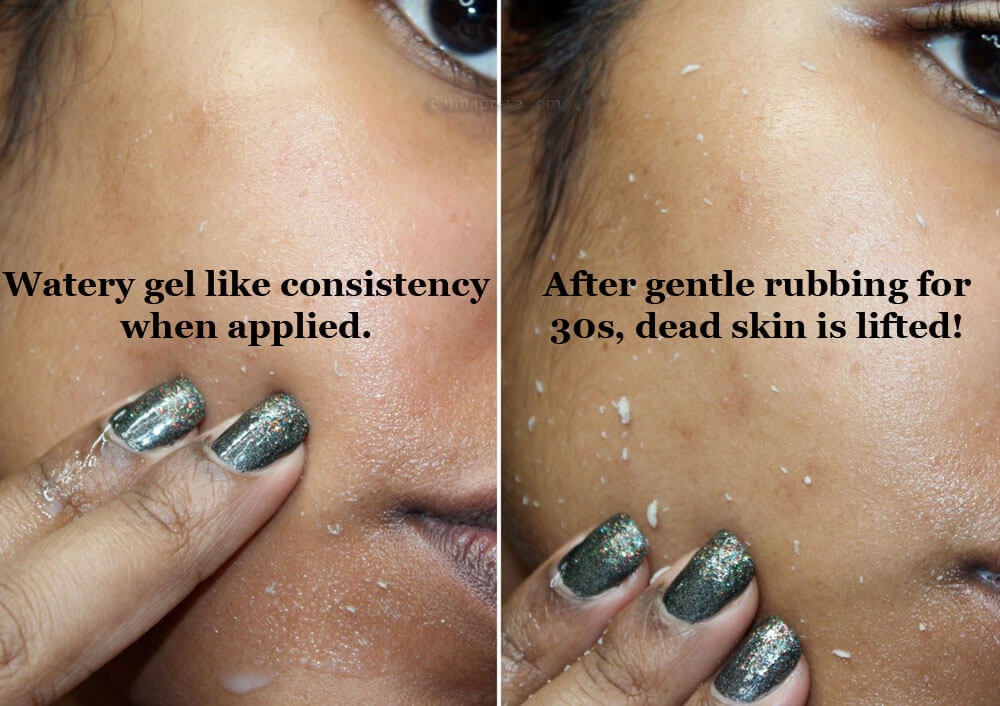
Sampled product on my face and this is how it looks!


My overall view about this product.

- I am always skeptical when companies claim that their product is no.1 selling. This is because, if it was so, I am sure it would have been made known worldwide especially now with the advanced social media. I have not heard of it until I visited Watsons. 

- The consistency of the product is watery and gel like. You have to be careful when squeezing it out of the packet as you might spill some. It happened to me!

- It felt nice and cooling on my face when I applied it.

- After a few seconds I started to gently rub in circular motion for 30 seconds and white particles started to surface. This is supposed to be dead skin (See above pic on the right). Looks gross right!

- I washed my face afterwards and applied my usual skincare products like eye cream and moisturizer.

- I must say, my skin was so soft and smooth after the exfoliation. 

- With all said, I still need about a month or two to see how well it works and improves my skin. 

From what I read on their site, this product can also be used on elbows, knees and feet. I have not tried it yet.

If you would like to know more about CURE Natural Aqua Gel Exfoliator, you can visit their website and facebook.


For my Singaporean readers, you can get free samples at the cashier counter of Watsons. 
Don't be shy, just ask!
....................................................

Have you guys tried this product? Or something similar. What are your thoughts?


Friday, December 2, 2011

Luminess Air brush makeup for a flawless face (+Youtube Giveaway)

For a very long time, I have stayed away from airbrush makeup as I found it very expensive and intimidating with the loud compressors thus never included it is my professional freelance kit. Also, I learnt to apply makeup the old school way and that is to use makeup sponges and brushes so it was quite difficult to make the cross over.

Finally, took the leap and I am loving the results of air brush makeup with Luminess Air brush system. I just love how my face feels and looks like after airbrushing. Beautiful, glowing and radiant skin (of cos pregnancy has also contributed to the glowing LOL!). It lets my natural skin show true. This is how makeup should look like, it should not be a mask which most often is when applied wrongly.

Here is a before & after picture of me with the airbrush makeup. In case you were wondering, I have done no digital retouch at all.

See the difference!


Here are the pictures and details of the what comes in the kit.


 Four different shades to try. I am in the Tan/Dark range and chose the Ultra finish foundation. Shade 7 suits me very well.


Bronzer, blush, brightening glow and moist primer is also included.


 Air brush eyeshadow kit for brown eyes. 


What I liked about the Air brush system
- My skin looks flawless and radiant.
- It was so easy to use, beginner friendly.
- Love how you could build from light to heavy coverage.
- There are 3 different types of foundation finishes to choose from. Ultra (mix of satin and matte), Satin (for a dewy finish), Matte (for oily skin).
- Portable compressor which is not noisy.
- Super easy to clean and maintain after every use. (great that a cleaning bottle is included in the kit)
- The foundation is water based so it's lightweight on the skin. 
- Great for sensitive, problematic skin.
- Water resistant (Not waterproof).
- Makeup does not transfer, if only using airbrush makeup without powder or anything on top of it.
- Great kit to travel with.
- Makeup lasted for 6 hours (after that the oily t-zone started to show).

What I Disliked about the Air brush system
- Did not minimize wrinkles or pores as claimed on website.
- The eyeshadow kit is not work for me as I found it extremely difficult to apply on myself.

Overall feel
- It is a great beginner kit and even a pro kit for a makeup artist.
- I would definitely repurchase the foundation shades in a bigger bottle/container as I like the formula and consistency of the makeup.
- A value for money kit. The compressor is a one time investment so what you will have to repurchase is the foundation, blush, bronzer when they run out.

Luminess Air brush makeup demo/tutorial video, so you can see how easy it was for me to apply it.


 Here is the review & giveaway video. Luminess Air was kind enough to sponsor a giveaway.
Watch video for details!


This is the giveaway prize. It is worth about $200.

Hope you guys will participate in the giveaway on my Youtube channel and win this kit.

Thanks for coming by my lovelies.


(Disclaimer: Item was provided by company for review purposes. I say what I feel and never feel obliged to give a bias review. I stand by my view always!)


Wednesday, November 16, 2011

Modern Indian dinner party makeup

I love this look very much. I think it's the sari, that deep maroon shade with old gold sequin artwork. I treasure this sari a lot. This is because firstly my Mum chose this sari for me when I visited Singapore after I moved to Sweden earlier this year. Secondly, I wore this for my Husband's Doctorate ceremony at a castle in Sweden. I was one of the three ladies who wore sari (traditional Indian costume) for a traditional Swedish event. It was an awesome evening. 

So I thought why not share it with you guys, so you can learn and perhaps use this makeup look for special functions and events someday. 


Products used are:

FACE
MUFE - HD primer #0
Revlon - Photo ready foundation in caramel #10
Mac - Select moisture cover concealer NC44
MUFE - HD Blush #02
Camera ready cosmetics - Yellow tinted loose powder

EYES
Mac - Indianwood paintpot
Mac - Feline khol pencil
Sugarpill - Love + eyeshadow
TKB - Bronzed gold loose pigment
Mac - Dipdown fluid line (eyebrows)
La femme - Black eyeshadow
La femme - Golden sunset loose pigment
Mac - Blacktrack fluidline

CHEEKS
La femme - Peach blush
La femme - Golden sunset loose pigment

LIPS
OCC - Betty peige lip tar
Nyx - Mauve lip liner
Gabrini - Red lipgloss (alternate colour)

HAIR
Rapunzel Rapunzel clip in hair extensions P4/6 (Brown/Medium brown)

Video Tutorial


Sunday, November 13, 2011

Earth toned makeup (using Urban Decay Naked palette)

Earth toned/Neutral makeup featuring the famous Urban Decay Naked palette. To be very honest, if you don't have this palette, you are not missing out much. I believe most of the colors are dupable from the 88 neutral eyeshadow palette which can be found on ebay and many other online makeup stores (eg, Coastal scents, Sedona lace, etc...). This look is appropriate for work, lunch out with friends and those days that you would like to tone down on makeup.

I hope you like this tutorial.


Products used are:

FACE
Luminess Air brush system (Will do a video about this system soon)

EYES
Urban decay - Primer potion
Urban decay - Buck & Darkhorse eyeshadow from the naked palette (eyebrows)
Mac - Dipdown fluid line
Urban decay - Buck eyeshadow from the naked palette (crease)
Urban decay - Naked eyeshadow from the naked palette (blending)
Urban decay - Sidecar eyeshadow from the naked palette (highlight)
Mac - Feline Kohl eye pencil
Loreal - Double extension carbon black mascara

CHEEKS
Luminess Air brush system - Apricot blush #7

LIPS
Mac - Fast play lipstick


Video Tutorial

Thanks for coming by!

Thursday, November 10, 2011

Viva La Diva Arty nail foils - Is it worth the $$?


I have received so many questions from viewers asking what I used on my nails in the recent "Queen Cleopatra inspired makeup look".
 It was self adhesive foils. It was my first time trying them. To be honest, when I bought them, I knew that they were not really going to last on my nails. However, I wanted to try. So while shopping at my local beauty supply store here in Sweden, I found the Viva La Diva Arty nail foils. I picked up two different designs, one was plain gold metallic foil and the other one was an animal print. 


These self adhesive stickers were pretty easy to apply. Instructions on application was provided on the back of the packaging. 

Pros
- Pretty looking nails
- Great for those days when you need a quick fix before heading out for a party or something.
- It was so easy to take them off. Just peel them off the nail slowly. 

Cons
- If you have a small nail bed like me, you will have to measure and cut, which can be inconvenient if you are in a hurry or do not have the patience.
- You will have to use a coarse nail file to file of the excess foil which I am not comfortable with.
- After a day or two, the foils start to peel off. (It drove me crazy!)
- Did not like that I had to mildly file the surface of my nail first before applying the foil. 

Overall
If you are looking at getting fancy looking nails at the comfort of your home, these self adhesive foils would work. Just be prepared that they don't last as long as a regular nail polish would. Can't expect much from stickers right!?


Have anyone of you tried the nail stickers before? What do you think if them?


Tuesday, November 8, 2011

60s & 70s Inspired Indian/Bollywood bridal makeup

Recently, I have become very interested in tracing the Indian makeup trends through the different eras and thought I should start from the 1960s/70s. 1960s and 1970s were the era of colours for both Bollywood and Kollywood (Tamil) movies. Black & white movies were facing out. This was the era where makeup was kept simple, classy and doll like . I have great memories from my childhood watching old classic tamil movies with my maternal grandmother. Then, as a child, I didn't really appreciate the beauty of the actresses. 

All my tutorials on Youtube are planned and I usually do my research before making the videos. Did a simple search on Youtube and found that there wasn't many videos dedicated to the makeup trends of this era (in terms of Indian bridal makeup of course). I made this tutorial based on the pictures I have seen of the old actresses thus I can't ensure that this was how makeup was done then. However, it is quite close to the classic Indian beauties of the 60s/70s. As always, I have made sure that this look was suitable & wearable in the current times.


Here are the Tamil/Hindi actresses who are the inspiration for this look.

Sadhana, Saroja Devi, Sharmila Tagore & Mumtaz

Products used are:

FACE
Mac - Pro longwear foundation Nc45
Mac - Pro longwear concealer Nc50 (for mixing)
Mac - Select moisture cover concealer Nc44
Camera ready cosmetics - Yellow tinted loose powder

EYES
Mac - Dipdown fluidline
Mac - Fresco paintpot
Inglot - Pale pink e/s
Mac - Deep/Dark mineralized skin finish
Mac - Blacktrack fluidline
Mac - Chomographic pencil Nw25/Nc30
Nyx - Baby pink eyeliner
Loreal - Double extension carbon black mascara
Ebay - False lashes

CHEEKS
La femme - Stormy rose blush

LIPS
Mac - Gulabi lipstick 

*All accessories are from my own collection. Some are as old as 15 years old. 

Video Tutorial


I hope you like this look. 

Have a great week lovelies!


Friday, November 4, 2011

DIY: Basic Manicure (with simple nail art for short nails)


After moving to Sweden, I have become a very DIY person. Everything is so expensive here! Mainly because of the taxes. Now one of the things that I have learnt to do on my own is doing my own nails. Yes, I was very spoiled in Singapore as I would get my hands and feet done every month in a salon. It was very affordable and it made me happy. Ultimately, that is what matters! Don't you think so?

In my recent videos, many viewers have requested for me to do a DIY manicure/pedicure tutorial as they felt that my nails were well kept. Now, I need to clarify this. Firstly, I have dry hands (cuticles and feet) as I am a very hands on person when it comes to cleaning, washing dishes, etc... Oh, might add that the Swedish weather has not been kind to my skin either. Lastly, I have no choice but to do mani/pedicures myself as I want to save money and not let my nails deteriorate.

I have made a video tutorial showing you how easy it is to get your nails done at the comfort of your home. You can use the same technique on toe nails too. I know many will start asking to do a pedicure video. Well, my toes are camera shy, so no videos in the near future featuring my little piggies (Sorry!).

Products used are :-

Sally Hansen Nail polish remover
Cotton pad
Glass nail file (much better than emery board files)
Towel (Optional)
China Glaze white tea extract manicure soak (Cuticle softener)
Manicure soak bowl (or any type of shallow container)
Cuticle pusher or orange stick (personally prefer the rubber tip ones as they are gentle)
Cuticle cutter
Seche vite nail treatment for weak and thinning nails
The Faceshop Almond oil cuticle & nail balm (vaseline works well too)
Nail art stencil sticker
H&M Red nails polish
H&M Golden treasure polish
Orly in a snap top coat (this has a quick drying formula)


Video Tutorial


Monday, October 31, 2011

Queen Cleopatra inspired makeup look (for fancy dress party)

In 2008, I made a similar look for a contest hosted by Kandeejohnson from Youtube. This time, I have created a much better version of the look and really enjoyed making this tutorial. Have always been fascinated by ancient Egyptian history.

It's unfortunate that I was unable to include any music as my editing software was acting strange for no reason. However I hope you will still enjoy this video regardless.


Products used are

EYES
Two faced shadow insurance - Eyeshadow primer
MUFE - Shade 12 aqua cream (bronzy gold)
Rhomlon - Dark blue eye pencil
Inglot - #426 deep blue eyeshadow
Spectrum cosmetics - Fort knox pigment
Inglot - #439 black eyeshadow
Mac - Feline eye khol pencil
Mac - Blacktrack fluidline
Inglot - #77 matte black gel liner
La femme - Turquoise sparkle dust
Cinema secret - Eye liner sealer
Mac - False lashes mascara in false black
Ebay - False lashes
Ebay - Rhinestones (optional)

CHEEKS
Sleek - Face contour kit in medium
Mac - Saffron eyeshadow 
Spectrum cosmetics - Fort knox pigment

LIPS
Lakme - Deep red lipliner
Gabrini - #5 dark red lip gloss
Spectrum cosmetics - Fort know pigment

Video tutorial

Happy Halloween! Be safe!

:)


Wednesday, October 26, 2011

Review: Sigma Flat kabuki F80 with video demo


This is by far one of the best face brushes I have ever used. It spreads the foundation smoothly without causing any abrasion to the skin. The bristles are very soft. It is made of synthetic fibre, this means that it picks up lesser product, is easy to clean and slows down bacteria growth compared to a natural bristle brush. I used it to apply primer, foundation, concealer and set the makeup with powder. It was very easy to buff out the products for a flawless finish (well almost LOL).


Pros
- Soft on the skin
- Non abrasive (so it's great for sensitive skin)
- Does not absorb too much product
- Can be used as an all purpose face brush (primer, concealer, foundation and even powder)

Cons
- The white part of the brush easily gets stained when using a darker colored foundation

Overall
I usually don't say this, but here it goes... This is a must have makeup tool if you like using a brush to apply your foundation/concealer, especially liquid or silicone based products.

Here is a video demo featuring the F80 flat kabuki brush.


Products used in the video:

FACE 
Sigma flat kabuki F80
MUFE HD primer #0
Mac prolong wear foundation NC45 (full pump)
Mac prolong wear concealer NC50 (tiny drop to darken the foundation)
Mac select moisture cover concealer NC44
Camera ready cosmetics yellow tinted loose powder


Have you tried this brush? Do you like it as much as I do?
I would love to hear your thoughts!

Thanks for coming by.


Tuesday, October 25, 2011

Easy teal eye look (Suitable for brown eyes & skin tone)

I think both teal & turquoise colors are amazing on darker skin tone beauties. This was a highly requested makeup look by subscribers after I wore something similar in one of my other older videos. An easy look using very little makeup products. A very novice friendly look.


Products used are:

EYES
Mac - Siahi fluidline
Kryolan - Matte eyeshadow palette (deep turquoise)
Mac - Ricepaper e/s
Mac - Feline eye khol pencil
Loreal - Double extension mascara in carbon black

CHEEKS
La femme - Peach blush

LIPS
Lakme - Brown lip liner
Mac - Mocha lipstick
Mac - Straight to the head lip gloss

Video tutorial


Hope you like it!

Ciao!